Saturday, December 5, 2015

TIGGER

-=+=-
This week I am drawing Tigger from Winnie the Pooh. The materials you need are pens, a pencil, and paper. 
-=+=-
Step 1: First draw the head. Add all the little details like whiskers and spots. Make sure to tilt the head because the body will be a bit tilted too.
-=+=-
Step 2: Draw the hands. Have one hand right under the neck, while making it longer. The other hand should be on the bottom lying there, since he is a disney character draw him thumbs personifying him. Keep drawing patches along the way.
-=+=-
Step 3:Draw the rest of the body except for the tail. Only draw three legs since the fourth isn't visible in the position he is in. 
-=+=-
Step 4: Draw the tail with a butterfly. Since the head was originally tilted it looks like he is staring at the butterfly :)
-=+=-


  _______________-=+=-________________

Sunday, November 15, 2015

MILEY CYRUS

-=+=-
For those of you who follow me on social media, you got a sneak peak on this weeks' drawing. This week I am drawing Miley Cyrus (or attempting to). The materials you need are the same as last week. I am apologizing in advance that the pictures are a bit wonky since I did this on the go instead of in my usual area.
-=+=-
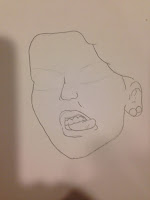
Step 1: First, let's draw the outline of her face and the ear. She has a double piercing so draw two earrings. At the right side of the face start the hair line.
-=+=-
Step 2: Draw the nose, make it a bit scrunched up. I made an outline for the eyes to mark where they should be but you don't have to. Draw the mouth and have the tongue sticking out the side. Make a little skin mark between the nose and the mouth.
-=+=-
Step 3: Make the eyes and the eyebrows a little scrunched up like the nose. Start the rest of the hair but only the side. 
-=+=-
Step 4: Finish the haircut to the side. Shade everything in before you color to give it more texture.


 _______________-=+=-________________
P.S. I didn't color the skin because I couldn't find a good shade for it
 _______________-=+=-________________


Saturday, November 7, 2015

SIMBA THE LION

-=+=-
This week I am drawing Simba from the Lion King. The materials you need are paper, pencils, and markers if you wish to recreate the colored version as well. Starting next week I will start changing things up and only be drawing things due to requests so be sure to request.
-=+=-
Step 1: The outline of the face. Simba has more of a squarish head. Make his ears of the sides of his head and start the mouth. Make sure to emphasize his fur in certain areas.
-=+=-
Step 2: Finish the face. Add in the eyes and the whiskers. Start the body. Add fur in the middle of it. Curve the beginning of his leg.
-=+=-
Step 3: Shade the ears and continue the body. Draw most of the three legs and leave room for the fourth one. Draw in the stomach. Make sure to curve all the legs.
-=+=-
Step 4: Draw in the edge of the other foot. Draw in the tail and the fur at the tip. Draw in the toes, I only did four but you can do five if you wish.

 _______________-=+=-________________
P.S. I chose a shade darker than I should've so it might look extra tan. Sorry.
 _______________-=+=-________________


Sunday, November 1, 2015

MUSHU THE DRAGON

-=+=-
This week I am drawing Mushu from Mulan. Once again, I will show the colored version of this drawing. If anyone was wondering I use prismacolor markers instead of copics. Unfortunately, they both are crazy expensive for markers, but trust me they're worth it.
-=+=-
Step 1: Draw the tail, make sure to curl it. Start the left leg from the end of the tail.Make a small line on top to reference where the body will begin.
-=+=
Step 2: Draw the body. Have it curl up just not as much as the tail. Draw a stomach line almost in the middle of the body. Lastly, draw the other leg from the stomach.
-=+=-
Step 3: Draw in the arms. Next to each arms make some spikes. Start the face, you can draw it however but I made an outline of it. Look at the pictures below if you want.
-=+=-
Step 4: Finish the face. Draw in his ears and horns at the top. Draw in the eyes. They should be pretty big. Make some whiskers, one on each side. Draw in the mouth and whala. There you have it, Mushu the Dragon.
    
 _______________-=+=-________________


Saturday, October 24, 2015

BELLE

-=+=-
This week I am drawing Belle from Beauty and the Beast. The materials you need are a pencil and paper. This week, though, I am doing something different. I will show you the colored version at the end.
_________________________________________________________________________________  
     Step 1: Draw the face and the neck to the side. Start the shoulder, don't add a collar bone if you don't want to (I didn't). Draw the bangs at the very top of her head and on the right curve the hair and then finish it up and drag it down to the collar area.
_________________________________________________________________________________
_________________________________________________________________________________
Step 2: Finish the top of the hair and add a bun to the very top. Start her dress by adding a ruffle to the edge of the shoulders from step one. Draw the corset a bit to the right so you can add the arm in later. 
__________________________________________________________________________________________________________________________________________________________________
   Step 3: Finish the rest of her hair. Draw in her hands. Her gloves must cover most of her arms. Start the rest of her dress. Draw half of the bottom half of her dress, and a ruffle across the entire dress, curving it every so often.
_________________________________________________________________________________________________________________________________________________________________
Step 4: Finish the rest of the dress. Then, do the facial features. After that you are done :)
_________________________________________________________________________________


P.S. Here is the colored version as I promised above. :) Hope you enjoyed my blog.


Friday, October 16, 2015

CARL FROM UP

-=+=-
This week I am drawing Carl from Up. The only materials you will need are a piece of paper and a pencil.
_________________________________________________________________________________
Step 1: Draw the head and the hair. Make his over coat come out of his head and right below the ears. Attach the arms to the ends of the leaves, but make sure to have one arm in a closed fist for later.
__________________________________________________________________________________________________________________________________________________________________Step 2: Put in a belt in the middle of the coat. Next, draw in a bow under his head but not the entire bow. Lastly(for this step), draw an oval in the middle of his head as his nose.
__________________________________________________________________________________________________________________________________________________________________
Step 3: Draw the legs off of the belt. Make his shoes simple and just make them rounded squares (see picture for reference). Lastly add marks to the pants to make them look realistic.
__________________________________________________________________________________________________________________________________________________________________Step 4: Add facial features. His glasses take up half the face so make sure to make them big. The mouth comes out of his nose. Draw the eyebrows on the top of the glasses. Draw three balloons from his clenched fist. Ta Da :) You're done!
_________________________________________________________________________________        


Wednesday, October 7, 2015

JASMINE

-=+=-
This week I am drawing Jasmine the Disney princess. The only materials that you need are a pencil and paper. 
_________________________________________________________________________________Step 1: The head. First draw the oval shaped head. Next draw her right earring and the little edge of the left earring. Draw the top of her hair and then the little head band on the very bottom of the top part of the hair.
_________________________________________________________________________________
_________________________________________________________________________________Step 2: The upper body. Draw in her necklace and attach her shoulders to the sides. Put her crop top about two centimeters lower. Draw in her arms but not fully because you don't know where the rest of the body is going to be yet.
_________________________________________________________________________________
_________________________________________________________________________________Step 3: The rest of her hair. Jasmine normally has really long hair, and it's usually in a bubble ponytail. Draw in the rest of her upper body. Put in the little belt at the bottom.
_________________________________________________________________________________
_________________________________________________________________________________Step 4: Now for the facial features. The nose is going to take up half of the face. Her eyes shouldn't be very symmetric to each other. Her mouth should be tilted to the side a bit.
_________________________________________________________________________________


Thursday, October 1, 2015

PETER PAN

-=+=-
Step by Step
This week I am drawing Peter Pan, as requested by Natalie. The only materials you need are a pencil and paper :). Since this drawing is bigger than the others the steps are going to have more in them than usual.
_______________________________________________________________________
Step 1: The head. First of draw the face itself. Since he is going to have a beanie, add hair sticking out of the sides. Make sure you remember to put the feather on top of the beanie. For the mouth make it larger to make his expression more open and bigger.
_______________________________________________________________________
_______________________________________________________________________
Step 2: The torso. His shirt is originally buttoned at the top, so make sure you put in the collar. His sleeves are cut up so make them sliced into triangles (use picture on the bottom for reference). Add a little belt on the bottom.
_______________________________________________________________________
_______________________________________________________________________
Step 3: Draw in the rest of his shirt. Put his little knife to the side of the shirt, covering part of the belt and shirt. Draw in the tops of the legs and arms. Make sure they go opposite directions (the arms). For the legs draw in the knee. Put a little arch if necessary.
________________________________________________________________________
________________________________________________________________________
Step 4: Put the fingers onto the hands. For the left hand draw in a clenched fist. For the right hand make it an open arm. Put his brown leather shoes at the bottom of his feet, with little "collars"on the edges (refer to the picture).
_________________________________________________________________________
                                                                           
                     
P.S sorry about the first picture it wouldn't let me turn it :(

Wednesday, September 23, 2015

GUS GUS THE MOUSE

-=+=-
Step by Step
This is one of the mice from Cinderella. If you read the title then you'd see the mouse is named Gus Gus. The only materials you need are a pencil and paper.

_________________________________________________________________________________
Step 1: The face. His face is a bit ovals. Make the top flat so you have room for his hat. Draw the ears out of the edge of the face.
_________________________________________________________________________________
_________________________________________________________________________________
Step 2: Put in the facial features. Add the arms. One arm comes out of the face. The other out of the lower part where the neck should be. Draw in the shirt. Make sure it looks like a crop top. Add some whiskers on the nose.
_________________________________________________________________________________
_________________________________________________________________________________
Step 3: Add in the lower body. Draw the legs through the stomach. Put the shoes on the bottom. Look at the picture below, and make sure that you have some arch on the shoes.
_________________________________________________________________________________
_________________________________________________________________________________
Step 4: Add some designs. Finish up the mouth. Put some cheese at the top of his hand. If you want to color it go ahead. The shirt should be yellow. That's it!
_________________________________________________________________________________


Thursday, September 17, 2015

ALICE IN WONDERLAND

-=+=-
Step By Step 
This week I am drawing Alice in Wonderland. The only materials you need are a pencil and paper.
__________________________________________________________________________________________________________
 Step 1: Draw a jar. Make the jar at least 4 inches tall. At the top 
of the jar, draw her upper body. Also add her arms holding onto the jar. For reference, use the picture below. 
_____________________________________________________
Step 2: Draw in the rest of her dress. If wanted, you can put her 
apron on it. Draw the tag on the jar. Later we will label it. Sketch 
in some feet underneath. Make sure to draw the feet on the same 
level so they look even.
_____________________________________________________
 Step 3: The head. This is the most important part. Without the 
head, well it’s not an actual person :). While making her facial 
expression make sure she looks like she's shocked.
_____________________________________________________
Step 4: Label the sign. You can write anything on it, but I wrote 
"Drink Me" since it was in the book/movie. Remember to add her 
headband, to the top of her hair.             
 _____________________________________________________


Thursday, September 10, 2015

DREAM CATCHER

-=+=-
Step By Step
This week I am drawing a dream catcher. The only materials you need are a pencil and paper.
____________________________________________________________
Step 1: Draw a circle. Inside that circle draw one that is slightly smaller. 
On each of the sides draw a small circle in between the two circles.
____________________________________________________________ 
____________________________________________________________

Step 2: Draw three lines on the bottom of the circle. Space them out. 
Make the line in the middle longer then the ones on the ends. 
The ones on the ends should be the same size. Draw flower petals under 
the circles from earlier. You can connect them or you can leave them as simple
as they are.
____________________________________________________________
____________________________________________________________
Step 3:Add some decor to the three lines. Possibly leaves at 
      the ends, or lines in between. If you want you can even put circles on the
 lines.
____________________________________________________________
____________________________________________________________
Step 4: DECORATE! Add any details you like. :)
____________________________________________________________